Showing posts with label MS Word. Show all posts

Tuesday, 12 April 2016

How to use Style Sheets in MS Word

 Style sheets are a useful feature in MS Word that can make writing essays and formatting them correctly much easier. APA has strict requirements for headings and body text styles, so by setting your style sheets correctly, you can save yourself a lot of work and improve your essay writing grades.

The first thing to notice is that MS Word has built-in styles. You can see them when you are in the "Home" tab. However, Word usually has Calibri or Arial as the default font for "Normal." Although fonts are not specified in APA style, a serif font such as Times is normally recommended. Some teachers can be more fussy, so don't take a chance. Use Times or Times New Roman for your body text.

To change the settings for any style, right click (control click on a Mac) to pull up the "Modify" dialogue. The "Modify" dialogue will show all the parameters for the style.

You can make life even easier by basing one style on another.

The pop-up menu in the bottom right corner (shows "Format" in the image) gives you access to the paragraph settings. That way you can set indents and spacing as well for the style.

The heading style shown here is the correct style for main headings in APA format. This should be centered, bold (and you write things with upper and lower case).

Secondary headings in APA format are left aligned bold with upper and lower case.

Third headings in APA style are left aligned bold, with only upper case at the beginning and a period at the end. They are followed by body text on the same line. Because MS Word does not allow you to have different styles in the same paragraph, you can't set a head 3 style. Simple write the paragraph in Body Text style and then select the text and make it bold.

Here's a sample showing the correct headings in APA style.


Saturday, 20 February 2016

How to Use Track Changes in MS Word 2016

The latest update to MicroSoft Word has a few changes to the Track Changes function. Here's an update to my blog post showing how to use Track Changes.

As with previous versions of Word, you can find the controls for Track Changes in the Review Tab.
If you haven't explored the tabs, then you really aren't using Word to its great capabilities. If you're a student, then taking the time (when you're not under the pressure of an essay deadline) to learn how to use the various functions of Word is a great idea. If you do this, you will save tons of time when working on your essays.

When you receive an essay back from me or another editor, you will find all the changes marked with the Track Changes tools. I like to do this for both academic and non-academic clients so they can see what I've done. I hope students will review these changes to help them write better. I want my business clients to be able to review my changes to ensure that the document still retains their original meaning.
Changes appear in one color in the margin on the right. Comments appear in another color. If different editors make changes, then each editor will have a different color. MS Word assigns the colors when there is more than one, so the color I see might not be the same color you see.

It's really easy to accept these changes, which means that the document is permanently changed to include the editor's changes.
Look at the second image above of the tool bar. In the REVIEW tab, you will see a button with a check mark labelled "Accept". It has a little down triangle beside it. That means when you click on it, a menu will pop up below it.
If you click on "Accept and Move to Next", you will be able to review each change at a time. If you click on "Accept All Changes", then all the changes will be incorporated into your document. And if you accept "Accept All Changes and Stop Tracking", all the changes will be accepted and the Track Changes function will be turned off. You can also easily turn off the Track Changes function using the button.

Although changes can be accepted in bulk, comments must be deleted one by one. Editors use comments to query factual statements, to indicate where a reference is needed, or to alert the writer to another issue that the writer should address. I try to leave a minimum of comments in the documents I edit, but these are very important communications between the editor and the writer, so please review these carefully before deleting.

In previous versions of MS Word, you could delete a comment by clicking the close box in the upper right hand corner of the comment. In the newest version, you must use (in Mac) Command + click to call up a contextual menu.

On a PC, you would use a right click for this. Simply choose "Delete Comment". Once you have deleted all comments, then the paper is clean and ready to hand in.

I know some editors return a clean version along with a version showing changes. However, I prefer to return only the marked up version because I really want to help writers become better writers. Some struggling writers might be overwhelmed when they see the vast number of changes that happen. But by focusing on just a few errors, you can vastly improve your writing. I find that most writers make the same kinds of errors over and over again, so a little effort to avoid your most common problems might yield a vast improvement in your writing.

Better writers might only have a few changes, so I like to show them that I actually did review the document carefully, even if the changes I made were just a comma here or there and other minor grammar and punctuation errors.

Friday, 20 November 2015

How to use spell check to improve your essay writing

The attached image comes from an essay I recently edited. Clearly, the intended word was "profitability." Fortunately, I spotted the error and corrected it. But it's unlikely that the client typed "probability." It's much more likely that she typed something else and the spell checker in M.S. Word flagged it, and she changed it to this word. Look what happens if I write a similar word to "profitability," but slightly misspelled.

Of the three suggestions for "profability," the correct word "profitability" is not included! It's so easy to choose the wrong word from the list. In fact, our brains are wired to see the word we expect to see. That's why proofreading your own work can be so hard. Once you believe that the correct word is there, you will see the correct word. Part of the skill of proofreading is teaching yourself to slow down and really see each word that's on the page, not the word that we think should be on the page.

Once you accept the wrong word, it becomes even harder to spot when you are proofreading. Because it's a correct word, it's no longer underlined in red. But now your brain really thinks you've corrected it, so it's even more likely to fail to notice the error when you proofread.

I actually think many people would benefit in their writing if they turn off spelling suggestions. This means you won't see any red underlined words at all, during the writing process. The advantage is that you can simply focus on the content of what you are writing. For anyone who struggles with spelling, or even keeping in mind the complex ideas that make up an essay paragraph, this means completing the whole sentence before even thinking about the spelling.

To do this, simply uncheck the "Check spelling as you type" option in the M.S. Word preferences. You can write with spelling errors and focus on your ideas. When you complete the whole document, you can still use the spellcheck tools to check your work.


However, as you can see, the options are still limited by the guess that M.S. Word has for what is the right word. In this scenario, you would still be wrong to pick the word from the list. You need to pay sufficient attention to the suggestions to realize that you need to actually type in the correct word. If you can get closer, then the spell checker can probably guess it.
And one more thing. Here's a screen shot from an on-line proofreading service, Ginger. Notice that Ginger, like MS Word, can't see the error. For accurate proofreading, there's nothing like a human.

Saturday, 8 August 2015

How to use MS Word's Track Changes Tools

When you receive your edited document back from our editing service, it will show the changes in a color like the picture at the right. (The color may be different, and if more than one editor has worked on your document, the color will be different for each editor.) This is the Track Changes function of MS Word. If you are using MS Word 2016, read this blog post for an update. The purpose of this function is for you to review the changes to see whether or not you agree with them. We also hope that you will learn something about writing, using references, and following the appropriate style guide, which is why we use this function. If your writing is good, then you may only see a few changes per paragraph as per the example. If you are having a lot of trouble expressing yourself, either because English is your second language, or because you have not mastered formal writing yet, then you may see an awful lot of changes. Certainly, this will make it harder to review each individual one. Whether you have many changes or just a few, it is quite easy to accept the changes so you can have a clean document.

At the top of your MS Word window are a number of Tabs. They are labelled Home, Document Elements, Tables, Charts, SmartArt, and Review. The Track Changes controls are found under the Review Tab.

Click on the Review tab to reveal the Track Changes buttons. Each one controls a pop-up menu. Click on the down arrowhead at the side of the "Accept" button to access the menu. To review and accept individual changes, begin by clicking on the change in the document. Then access the pop-up menu. You can either click on the actual point in the document where the change has been made (indicated by an underline, or line from the indication in the margin) or click on the marginal note. If you select the second choice, "Accept Change", the change will remain, the indication will disappear, the pop-up menu will disappear, and you can go ahead and do something else. In fact, this is the action that will occur if you click on the "Accept" button instead of its arrow. Most people probably want to review the next change, so a better choice is to select the first option, "Accept and Move to Next." In this case, the change will be accepted and the indicators will disappear (along with the pop-up menu) but the cursor in the document will jump to the next change. That's helpful, as you can then simply repeat the process by accessing the pop-up menu and clicking on "Accept and Move to Next."

The final way to accept changes, is to simply click "Accept All Changes in Document." This will remove all the comments at the side, all the lines indicating where changes have been made, and you will have a clean document (I will talk about the comments further on in this post.)

My suggestion for clients is to read through the entire document before you accept all changes. There are different options for displaying changes. I like to leave a document that is easy to read, so when I delete a word or move it, you can see it at the side, but the sentence in the document reads with all the intended changes. Sometimes other editors show deletions with a strikethrough, moves can also be displayed, and other variations exist. With these options, you need to read more carefully to be sure of what your sentences will be after you accept the changes. With document that we have edited, additions are shown in color and deletions are only shown in the margin. The sentences you read are the final form.

In addition to changes, sometimes editors want to put comments in documents. These could be to alert the reader to potential errors of fact. They could be to indicate where a reference is needed. In addition when I'm really unsure about a writer's intention, I might make an edit that I really want to draw the writer's attention to in order to ensure that I haven't changed the meaning. Sometimes editors simply write "Can't understand this sentence. Please revise." Personally, I think that's weak. If I really can't understand what my client wants to say, I will send a quick email asking for an explanation while I'm still doing the editing. My intent when editing is to return a document that's ready to use. Comments are shown in the accompanying image as green. Like changes, they can appear in many different colors.

Comments are not removed along with the edits when you choose "Accept All Changes in Document." Comments must be removed one by one. Nonetheless, they are very easy to remove.

To remove a comment, simply click in the X at the right top corner of the comment. Even with dozens of comments in a document, you can scroll along and remove them all fairly quickly.

If you have a lot of changes in a document, or some very long comments, they might not all fit into the space at the right hand side of the document on your screen. MS Word will automatically collapse them into a small bubble. While this looks more tidy, it prevents you from being able to read the comments or see the changes in detail. There's a simple way to deal with that. You can have the comments and changes appear in a list on the left. However, because they all appear, they can take up a lot of space, so they might not appear close to the actual change in the document.

This view is called the Review Pane. You can make it appear/disappear with a button located in the Review Tab, to the right of the Track Changes buttons. If you want to see the details of the changes, use this button to make the Review Pane appear. You can also close the Review Pane with the close box in its top left corner.

The final thing you may be struggling with is that after your document has been returned and you have accepted all changes you might want to do a little more writing. Perhaps you are adding material to your reference list, or perhaps you are simply polishing. But every time you make a change, it appears on the right and you have to go through the whole process of accepting changes. You know you shouldn't have to do this because you don't have to review your own changes. So you want to turn off Track Changes. Here's how:

You might have noticed this button already, but it's part of the Track Changes suite of tools in the Review Tab. Simply click on it to stop recording changes. Now your document can be edited as much as you like just like before.

If you have more questions or comments about the use of Track Changes, please leave a comment below. Thanks for reading!

Saturday, 20 September 2014

How to format headers in APA style essays

Many students find it difficult to format their APA essays with headers. Following these simple steps will solve this problem. In this post I will tell you how to insert running heads and page numbers in APA documents. These steps also work for heads in other style of essays, such as MLA, but the specific formatting may be slightly different.

Here's one of the most frustrating things about MicroSoft Word. The menu item used to insert a header is under the VIEW menu. Even after years of editing essays, I almost always look for it under the INSERT menu because I'm thinking to myself "I need to insert a running head." Ironically, after the header is created, you merely need to double click on it to edit it, so you don't need to go back to the VIEW menu to edit the header.

Notice that this is called "Header and Footer." The header and footer editing screens are always active at the same time, but you don't need to use footers in APA essays. They are used for other types of documents.

Once you have the header editing screen active, you need to type in the header info. Notice that APA requires the first page (the cover page) to have the header begin with the following phrase in capital letters: RUNNING HEAD. I don't know if they think anyone reading a university level essay might be stupid enough to not know why there is a title above every page of the essay, or if they just want to justify the use of the caps lock key every time someone writes an essay, but I think this looks ugly. I would dispense with this if it were up to me.

The other thing to notice is that the running head is not necessarily the same wording as the title. The running head should be short enough to fit on one line (leaving room for the page number) along with the words RUNNING HEAD. Let's say your essay title is "Sylvia Plath and the tortured genius: modern feminism and the struggle for autonomy in artistic creation." (Apologies to Sylvia Plath scholars, feminists, and artists.) That's way too long to fit on one line at the top of every page. So the running head would look like this: "RUNNING HEAD: Sylvia Plath and artistic creation."

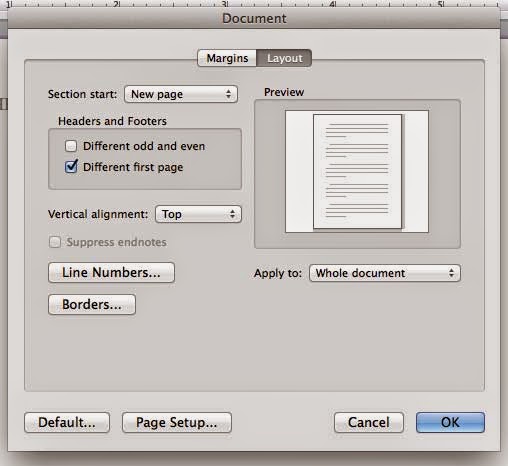
Only the cover page needs the caps lock RUNNING HEAD. All the other pages in the essay will have the short version of the title (but now it's in ALL CAPS). So you are going to have to insert the header one more time, but before you do that, you need to make sure one thing is set in the document. The formatting of the document needs to be set to have a different first page (the cover page). To do this, access the DOCUMENT formatting window. It's pretty simple. Under the FORMAT menu, select DOCUMENT, and the DOCUMENT window will open. Click on LAYOUT and the the check box on "Different first page." Now the second page in the document will have no header, so you can go to the second page, use the VIEW menu to view the editing screen for the header and footer, and then type in the running head in all caps.


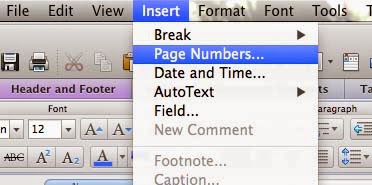
But now you need to also insert the page numbers. The headers are conveniently set up with pre-set tabs. As an aside, you should never move characters over by using a bunch of spaces. If you hit repeated spaces to move the page numbers to the right, then the location of the page numbers will be inconsistent depending on the computer of the person viewing the document. In some cases, the page numbers might even jump to a second line on the left. Always use the tab key (on the left side of the keyboard, just above the caps lock key) to move things. And take the time to learn how to set tabs. Depending on how long your running head is, when you hit the tab key, the cursor will jump to the middle of the page, or to the right hand side. If it goes to the middle, then do another tab to get the cursor to the right. Under the INSERT menu, choose PAGE NUMBERS to call up the page number dialogue box. Make sure you have alignment right and show on first page checked, and click OK. You can change the format to Roman numerals, etc, but probably the default is correct. If you have multiple sections on a thesis, then you need to use different formats and start the regular numbers on the first page of the actual content. Now, all you have to do is click the "Close" box on the little line under the header, and every page in your document will be properly formatted with APA headers.